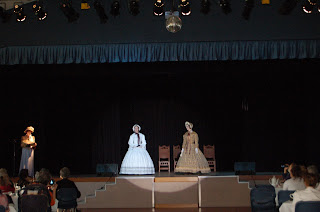
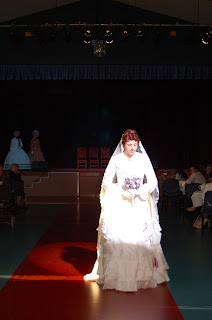
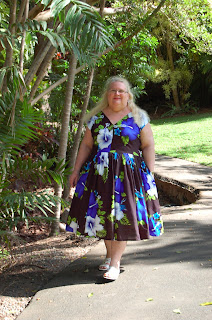
While last weekend was a quiet one, the previous weekend saw me busy as a bee. I volunteered to be a model for the Abbey Museum Fashion Parade High Tea. The event was to raise funds to restore the heritage stained glass windows in the Museum. Two of the organisers are friends of mine and asked for me to be one of the models. I was to wear three gowns.
The first, a new 1901 gown that I have made for EDAS (European Defensive Arts School) when we do bartitsu at History Alive. I found an original piece for sale on Etsy and decided that I would try my hand at a recreation. Because I am trying to be good and use my stash as much as possible this year, I dug out a piece of blue cotton organdy. I had planned to use it for a bustle gown sometime in the future, but this seemed like a good compromise. The cream cotton for the underblouse section came from my scraps bucket, as did the silk sash. The lace was leftover from my red tartan bustle and the buttons came from stash. I was very pleased with how I managed to do it all from my stash. I had also whipped up a matching hat to go with (also from stash materials). I also styled a new wig for this ensemble. It has a very forward poof that is a little reminiscent of Elvis, but it sits wonderfully under my hat.
The second, my 1780s Green Georgian ensemble for the section ranging 1750 - 1820s.
And finally, my 1880s gold and orange Natural Form Bustle. I got a lot of comment from people afterwards, that they liked the dress but weren't so sure about the yellow gold. I love it, so not too worried about that, and let's face it, not everyone likes all colours. I was completely against green until I started using it and finding colours that flattered me.
At any rate, I had a great time. We were horribly exhausted afterwards - all that rushing around. My back was killing after being pulled into three different corset shapes. We did some of the quickest changes imaginable. Thankfully my mum was on hand, volunteering herself as our dresser. She managed to duck out during the final section (Victorian) to snap some quick photos.
Friday, May 31, 2013
Thursday, May 30, 2013
Corsetry abounds
I'm a bit late posting, but a few weeks back, I started working on a number of undergarment pieces. This is one of them. When I originally made my long line Edwardian corset, it was too big. Mainly in that it was lacing closed and I still had a good amount of wiggle room - I guess that I squished a lot more than I anticipated. So, while I have the time, I decided to make a new one - cut down of course.
The pattern comes from Jill Saleen's Corsets. It is made of silk dupion, interlined with cotton and finished with a cotton lining. My photos are rather terrible because I was home along when I tried it on - but it does give you the gist of it.
My only problem with the corset is that it is a touch too small now. I'm kicking myself that I cut it down that bit more. It's really amazing how much a small amount cut off makes when sewn up. Thankfully I am in the process of trying to drop some kilos, so it should not be a problem for too long.
Wednesday, May 8, 2013
Petticoats and Corsets
I didn't think to be posting again so soon, but I am just so over the moon about the progress I have made. My neck is aching and my fingers are sore, but everything has been going so well.
First up, I finished my second 1900s petticoat. It is made from the same pattern as the previous one, just trimmed in a way that made use of the fabric and lace in my stash that I wanted to use. It is made out of white swiss cotton voile and trimmed with a white net lace. It has two ruffles on top, both stitched on with three rows of rouching. I then added some in set lace using a period correct method that I read about in the book "Victorian Sewing Techniques" where you stitch on the lace, then slip scissors in behind the lace and cut the fabric. You then fold each side back and stitch down. Quite simple really - easier than the way I was doing it before (cut then sew). I also added three rows of tucks above the lace to take up some length and add a little detail. The petticoat also has a short kick ruffle underneath made out of a slightly heavier cotton (last photo).
I love how frilly and feminine this petticoat has turned out. It's just like I pictured. I would have liked more lace on it, but as I am trying to use my stash only, I was limited to what I had - enough only for one row around.
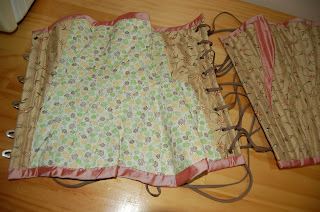
The other thing that I managed to finish today was my 1900s s-bend corset. I have made this one before, so I kinda knew what I was doing going in. But then again, it was about 5 years ago that I made it, so I did learn a few bits and pieces this time. The pattern is drafted and sized up from Corsets and Crinolines. But I feel that the next time I make this one, it could do with a couple more changes - for one, it could be a bit longer in the front for me. And it is probably a bit too small (though it could just be that I have eaten too much today), however as I am currently loosing weight - this should not be a problem.
Anyway, I really like how it turned out. I made it out of two pieces of silk. The embroidered stuff comes from a garment that friend gave me to cut up - she had only worn it once to a wedding and saw no reason to keep it. While the pink comes from my stash. I knew that I would need to use a different colour for the binding on the corset, so I decided to add a little in to make it match a bit better - on the bust gusset and hip shape pieces.
As you might see from the photos it really does give a mono-bosom shape just from the cut. It also has a very definite waist to hip ratio - making my waist appear smaller than it is. It probably does help that I have quite a bit of squish in me to move about. All in all though, I really like the shape it has come out as.
My tips if you are making this corset:
First up, I finished my second 1900s petticoat. It is made from the same pattern as the previous one, just trimmed in a way that made use of the fabric and lace in my stash that I wanted to use. It is made out of white swiss cotton voile and trimmed with a white net lace. It has two ruffles on top, both stitched on with three rows of rouching. I then added some in set lace using a period correct method that I read about in the book "Victorian Sewing Techniques" where you stitch on the lace, then slip scissors in behind the lace and cut the fabric. You then fold each side back and stitch down. Quite simple really - easier than the way I was doing it before (cut then sew). I also added three rows of tucks above the lace to take up some length and add a little detail. The petticoat also has a short kick ruffle underneath made out of a slightly heavier cotton (last photo).
I love how frilly and feminine this petticoat has turned out. It's just like I pictured. I would have liked more lace on it, but as I am trying to use my stash only, I was limited to what I had - enough only for one row around.
_________________________________________________
The other thing that I managed to finish today was my 1900s s-bend corset. I have made this one before, so I kinda knew what I was doing going in. But then again, it was about 5 years ago that I made it, so I did learn a few bits and pieces this time. The pattern is drafted and sized up from Corsets and Crinolines. But I feel that the next time I make this one, it could do with a couple more changes - for one, it could be a bit longer in the front for me. And it is probably a bit too small (though it could just be that I have eaten too much today), however as I am currently loosing weight - this should not be a problem.
Anyway, I really like how it turned out. I made it out of two pieces of silk. The embroidered stuff comes from a garment that friend gave me to cut up - she had only worn it once to a wedding and saw no reason to keep it. While the pink comes from my stash. I knew that I would need to use a different colour for the binding on the corset, so I decided to add a little in to make it match a bit better - on the bust gusset and hip shape pieces.
As you might see from the photos it really does give a mono-bosom shape just from the cut. It also has a very definite waist to hip ratio - making my waist appear smaller than it is. It probably does help that I have quite a bit of squish in me to move about. All in all though, I really like the shape it has come out as.
My tips if you are making this corset:
- make up three separate layers: the outermost layer, the lining layer and the middle layer. Because the boning does not follow the seams, you actually need to have two layers to sew together so that you get channels. I got around this by using strips of fabric on the inside of each channel. The only problem with my technique is that it can get terribly messy and probably adds bulk.
- you will most likely need to do a few full mock ups to get the pattern to your shape. Mine still isn't there.
- closer spaced eyelets. Mine are too far apart. I normally go closer together, but had a limited number in my stash, and didn't want to wait for my order to arrive.
- consider a thick busk for the centre front. I think it would really help you get that straight front that the corset should have. Next time I put it together, I will definitely be buying a wider one busk.
- waist tape - I have finally learnt how invaluable a waist tape is. It's especially important here as there is quite a bit of stress on the waist just from the cut of the corset. I just use inch wide cotton twill tape and sew it in after my boning channels are done.
Monday, May 6, 2013
Undergarments abound
While the job hunting continues, I have been making use of my time to get ahead on my sewing projects, and make a few extra pieces. For some time now, I have been wanting to work on new historical undergarments. In the past, mine were made on a purely functional basis so they were whipped up out of sheeting cotton that I bought for $2 / metre, and they weren't anything special. I've since been looking at extent pieces and how beautiful some of the undergarments can be even though they really don't get seen.
Last week, I spent quite a bit of time drafting up patterns and cutting out fabric, and the first of the new historical undergarments that I decided to make were for my 1900s gear. Mainly because I know that I will be wearing this stuff later in June.
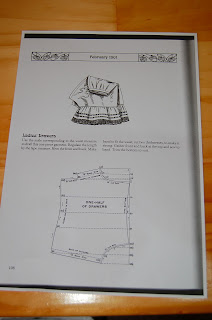
First up were the drawers. They are made out of a pretty pink cotton ('cause that's what I had in my stash). I drafted the pattern up from the scale styles in Frances Grimble's the Voice of Fashion book. The drafting is quite simple once you get the hang of it, I just forgot to double check the length of the drawers as I was going. I solved this problem in construction by adding a few pin tucks at the hem, however, they are still a little bit longer than I would like. The other issue that I had is that the drawers are very wide in the leg. I decided to add a few topstitched tucks on each side which helps to draw them in at the knee. The one feature that I really adore about these drawers is the wide hem allowance at the open crotch. It really helps them sit better and I think they are less likely to rub against my legs during wear. Over all, I'm very pleased with them.
The second task of the day was to whip up the new petticoat. Again, this is a petticoat drafted from a Frances Grimble book that I worked on a few years ago. I really like the shape of it, so thought I would make a nicer version. I really wanted a taffeta petticoat, but I just didn't have anything in my stash that I could use for it. Instead, I decided to use the wrong side of the left-over fabric that I bought for my Rapunzel costume. The only detail on the petticoat is the full ruffle and velvet ribbon where it is stitched on. I really wanted to add a bit of rucheing detail, but the fabric just isn't good for pressing - there is a very fine line between pressed and burnt when I was ironing it. In then end, I decided to keep it simple. The best thing about this though is that it is a great colour for underneath the gown I will be wearing with it - a navy blue gown made from cotton organdy.
Next on the agenda is a new s-bend corset. It has been started but there are a heck of a lot of boning channels that I have to stitch in. It shall not be long before it is done though.
Wednesday, May 1, 2013
Retro style picnic
Last weekend, I organised a Retro picnic to the Brisbane Botanic Gardens with a few of my girlfriends. We all brought along a little something to share for lunch, so it was a very yummy outing. It was simple and lovely to catch up with everyone in a relaxing environment.
For the occasion, I wore my new 1940s summer frock. I made it from an apple and bee print fabric that I bought to match one of the vintage hats that I bought many moons ago. It's a lovely light cotton voile, so perfect for warmer weather.
I also managed to finish a new dress for my mum. Made out of a black and blue hibiscus print rayon in one of the newer vintage vogue patterns out on the market at the moment. It's quite flattering and looks very good on her. She is very pleased with how it looks and I am glad that I managed to get it made in time for her to wear it.
And the other lovely ladies in attendance:
Subscribe to:
Posts (Atom)


